NestAds’s TikTok Pixel using the TikTok Event API to implement on your store. TikTok Events API is designed to give our advertisers a more reliable connection between TikTok and advertiser marketing data (servers, website, app, or CRM) while also providing the flexibility for advertisers to customize the information they share with TikTok. Sharing these events with TikTok helps marketing teams measure ad performance on TikTok, optimize ad delivery, and create target audiences.
In this post, you’ll learn how to create TikTok pixel in NestAds and install it on your website. Let’s get started now!
How to create new TikTok pixel & install it on your website
- Login to your NestAds account
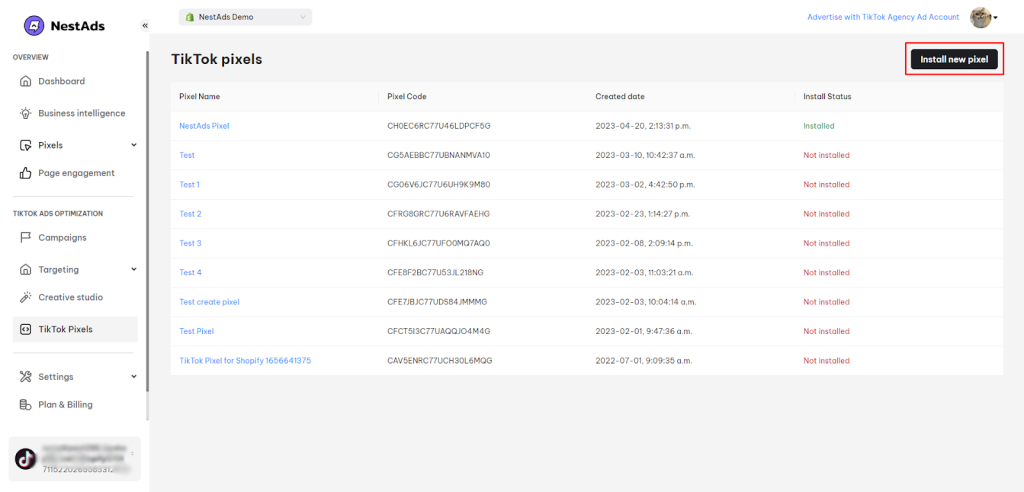
- Navigate to TikTok Pixels > Click on Install new pixel

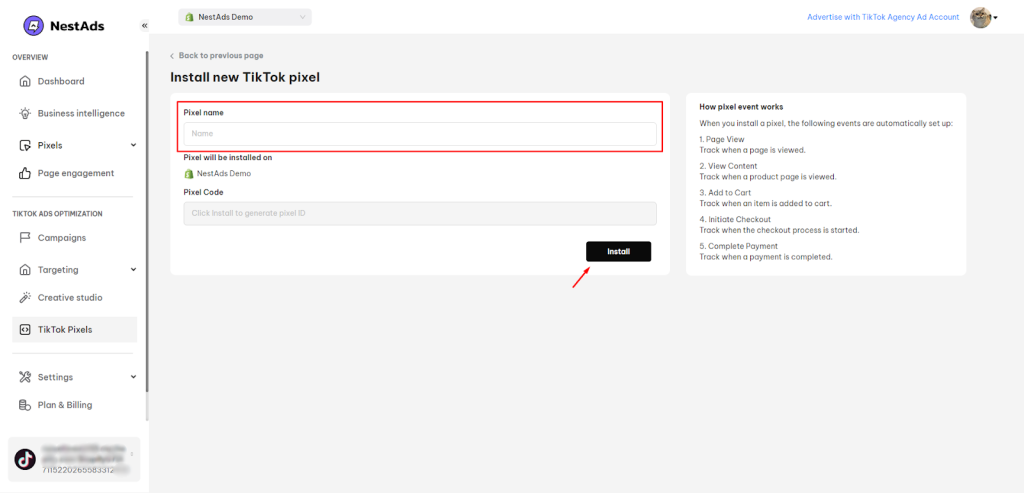
- Put your pixel a name, then click Install

- Go to the app embeds section > Enable the NestAds Pixel section > Click on Save button
How to install your existing TikTok pixel on website
In NestAds, you can install your TikTok pixel created on TikTok Ad Manager on website in a few clicks. Follow the instructions below:
- Login to your NestAds account
- Navigate to TikTok Pixels > Click on an existing pixel
- Click on Save & Install button
- Go to the app embeds section > Enable the NestAds Pixel section > Click on Save button
That’s done! Now you can rest assured that your pixel is well set and ready for data tracking.
📌 Note:
Given the changes brought about by iOS14, we highly recommend making use of our NestAds pixel. This will allow you to effectively track your customers’ activities and stay in touch with their interactions.
How to check if the TikTok Pixel API has been implemented successfully on your Shopify website
You can conveniently review the TikTok Pixel API directly within your TikTok Ads Manager by following these steps:
- Go to TikTok Ads Manager > Tools > Events
- Select Web Events > Pick the event > Verify Identity
- Choose the pixel > Review data in the Overview dashboard
Supported events (in case pixel created and installed in NestAds app)
- View Content
- AddTo Cart
- Initiate Checkout
- Complete Payment
>>> Read more: NestAds Pixel
Need any help?
If you need help, please contact us via live chat or email at [email protected]. Our support team is happy to assist!
 NestAffiliate
  NestDesk
  NestScale Bundles & Discounts
  NestScale Product Variants
  NestSend
  NestWidget


