 NestAffiliate
  NestDesk
  NestScale Product Variants
 What is NestAds Pixel?
NestAds Pixel is a small piece of code implemented on your Shopify store that helps you understand how your ads across multiple channels perform. It provides clear and accurate tracking of customer interactions, making it easier to see which ads lead to sales.
NestAds Pixel combines the technology of Shopify’s pixel with our own additional logic. This combination allows us to collect detailed information on customer behaviors at every touchpoint in your Shopify store.
NestAds Pixel is exclusively built for your Shopify stores!
Why use NestAds pixel?
Advertisers paint points – problems
- Changes in Apple’s iOS privacy policies
- Browser restrictions
- Planned phase-out of third-party cookies by 2025
What does the NestAds Pixel do?
- Reduce your ad spend
- Improve the accuracy of blending ROAS and revenue
- Compare your ad platform’s data with NestAds data
- Use our custom attribution model for more accurate attribution, in addition to the basic ones
- Real-time data collection with no delays (unlike your ad manager, data is collected and displayed within 30 minutes)
- Detailed order reports for each campaign, ad set, and ad level. This will allow you to review every order’s timeline and see the touch points the customer interacted with before purchasing.
And we are not
- Slow down your website: We use server-side tracking, which does not affect your site speed. Say goodbye to multiple complicated pieces of code added to your front end.
- Break any privacy laws: Our solution keeps you in compliance with privacy laws.
- Fix 100% of your attribution issues: No ad tracking and attribution tool can promise 100% accuracy, however, we will significantly improve your ad attribution accuracy, providing you with as much data as possible to make confident decisions.
How does NestAds Pixel work?
NestAds UTM tracking parameters
This is a snippet of code templates that you can add to the end of a URL/ ad destination to track the performance of campaigns.
Our current UTM system includes two main elements:
- Source: Currently labeled as
nads_source. This identifies where the traffic is coming from.
For example, if nads_source = facebook, it indicates that the traffic comes from Facebook Ads. This applies similarly to other sources (TikTok & Google Ads)- Ad ID: Currently labeled as
nads_adid. This identifies which specific ad the customer clicked on (the final layer within an ad campaign). This also helps us determine the associated campaign and ad group (referred to ad sets on some platforms like Facebook).
Note: For Google, particularly in Google Shopping campaigns and Performance Max campaigns, there are no individual ads, only campaigns and ad groups. Therefore, for these types of campaigns, we use nads_campaign for tracking.>>> Read more: Acceptable UTMs for NestAds
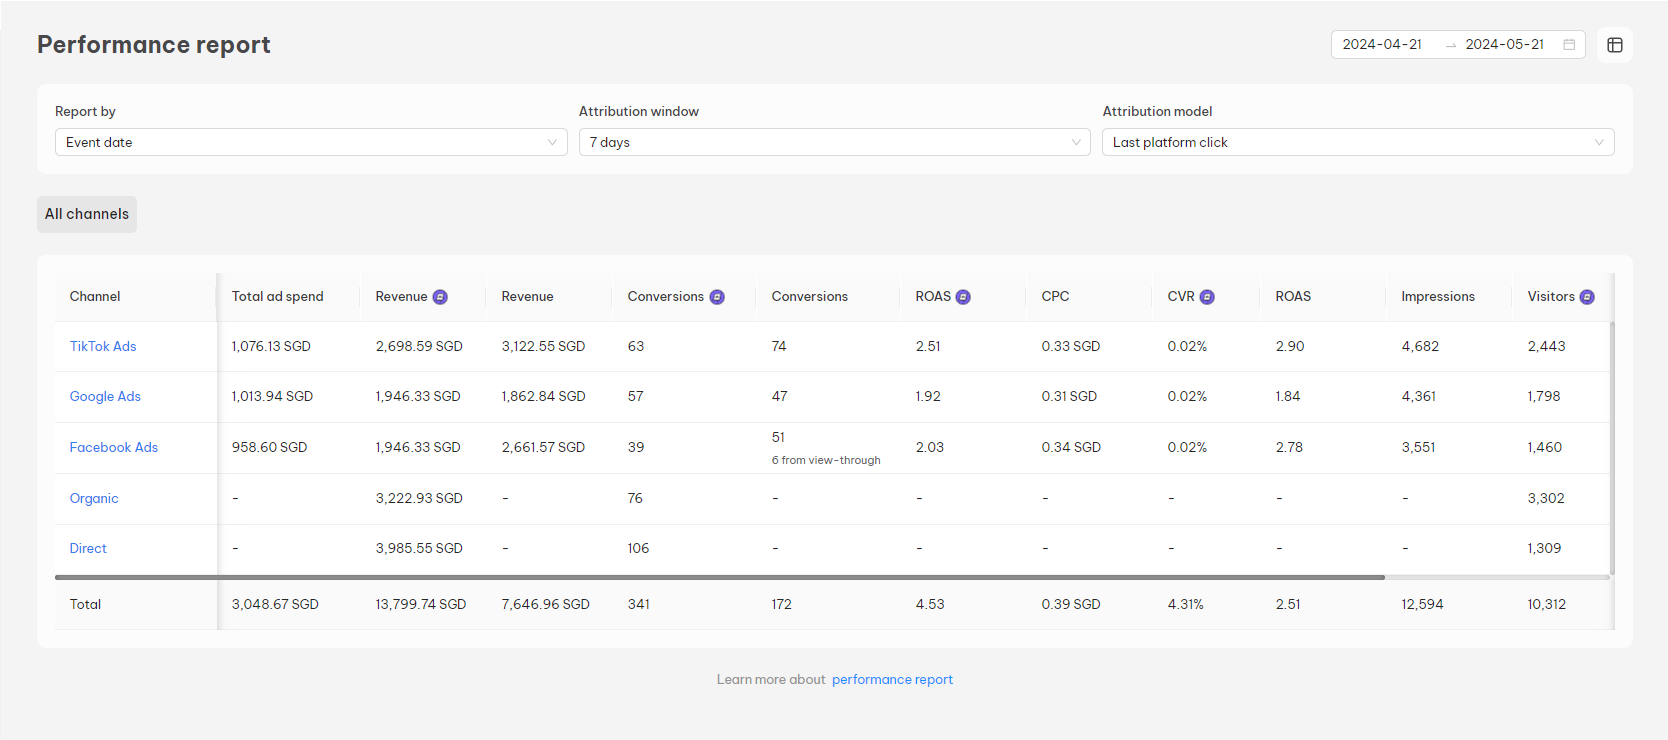
Performance report
The NestAds pixel collects your customer events separately from ad platform pixels and reports the data in a separate column within the performance report.
Source tracking
Simply put, if a customer clicks on ads from Google, TikTok, or Meta and navigates on your site, we will track and attribute that activity to the respective platform as a paid source.
For non-paid sources, we distinguish between direct and organic traffic:
- Direct Traffic: If customers visit your website by typing the exact address and then make a purchase, this is tracked as direct traffic.
- Organic Traffic: If customers arrive via an organic source like search engines (Google Search, Bing Search, etc.), we track this under organic sources.
This dashboard is handy because it shows all sources to your site that lead to conversions, not just paid ones. It also helps you understand the total conversion value we have tracked for your business.
Attribution models & attribution windows
NestAds gives you different attribution models that give you different points of view and decide how data is attributed as you want. The default attribution model is Last platform click
>> See more: Attribution models in NestAds
NestAds also offers predefined date filters ranging from 1 day to the last 90 days. Each attribution window can be selected based on your specific needs and the customer behavior typical of your business industry.
For example, if you are selling furniture or luxury items, customers may take a longer period to make a decision, sometimes months before purchasing. In such cases, you might want to expand the attribution window to understand the difference between the click date (when they clicked on the ad) and the event date (when the purchase actually happened). This allows for a more accurate tracking of the customer journey.
Customer journey
From the data collected by the NestAds pixel, we elevate the standard report to provide a comprehensive view of your customers’ touchpoints. By visualizing this data into a seamless path, we create what we call the customer journey. This holistic view helps you understand the entire process from initial view to complete purchase, giving you deeper insights into your customers’ interactions with your brand.
>> See more: NestAds Pixel: Customer Journey
Cohort analysis
Cohort analysis is a method of analyzing your customers by grouping them based on shared characteristics and then tracking their behavior over time. Typically, cohorts are formed based on when a customer made their initial purchase, creating a lifelong association with that cohort.
By using NestAds pixel to collect customer data, identify each customer and track their purchase history, cohort analysis allows you to segment your customer base. This enhances your understanding of lifetime value (LTV) and retention rates within different customer groups. This segmentation aids in crucial decision-making, including:
- When do customers usually churn?
- How much of your revenue comes from new vs long-time customers?
- When is the best time to re-engage your customers?
>> See more: Cohort Analysis
Need any help?
Feel free to contact us via live chat in app or email at [email protected]. Our support team is happy to help.