After activating automation flows for a period of time, you’ll want to know how they perform. So in this article, you will learn about How to check Automation flow analytic in NestSend.
📌Note: Before reading automation flow analytic, make sure that you have created and activated your automation flows. If you haven’t, please check out the guideline here
How to read automation flow analytic
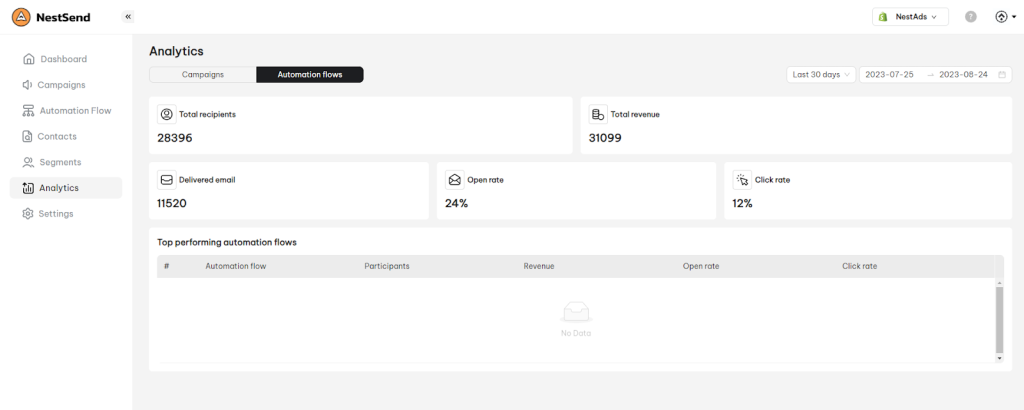
- Navigate to Analytics > click on Automation flow tab
- Here you will see some important metrics about the performance of your automation flows
- Total recipients: Total number of customers who received your emails in all automation flows
- Total revenue: Total amount of revenue generated from customers who clicked on the automation flows
- Delivered email: Total number of sent emails in all automation flows
- Open rate: The rate at which your customers open your emails (the number of individuals opening your email divided by the number of recipients).
- Click rate: The percentage of people who clicked a link in your email out of the people received it.
The diagram shows you the performance of your all automation flows based on 3 metrics: clicked rate, opened rate and delivered email.
Please note that the analytic is showing the data collected within the last 30 days as default. You can change the time range as you want to view data accordingly.
Need more help?
Feel free to contact us via live or email at [email protected]. Our support team is happy to assist you!
 NestAds
  NestAffiliate
  NestDesk
  NestScale Bundles & Discounts
  NestScale Product Variants
  NestWidget
