 NestAffiliate
  NestDesk
  NestScale Product Variants
 NestAds allows you to create a custom attribution model tailored to your business needs.
This feature enables you to define how credit is assigned to different touchpoints along the customer journey, ensuring accurate performance measurement and data-driven decision-making.
In this article, you will learn how to create a custom attribution model in NestAds. Let’s get started.
How to create a custom attribution model in NestAds
Step 1: Access the Custom Attribution Settings
- Log into your NestAds account
- Navigate to the Attribution section in the left-side menu
- Click on Tracking Setup submenu
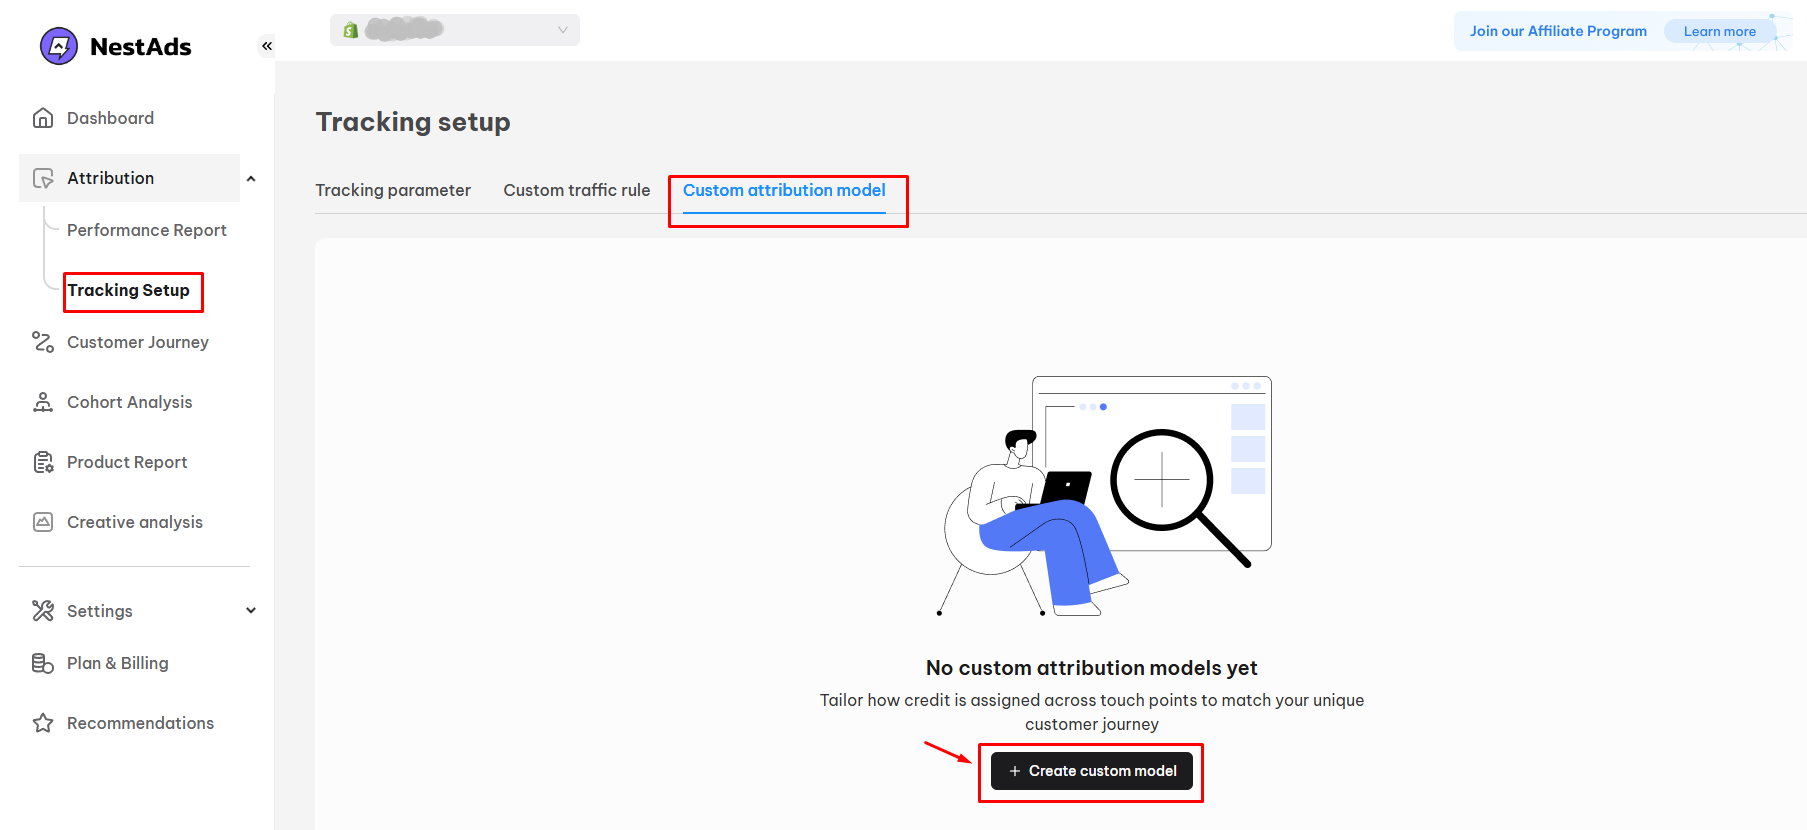
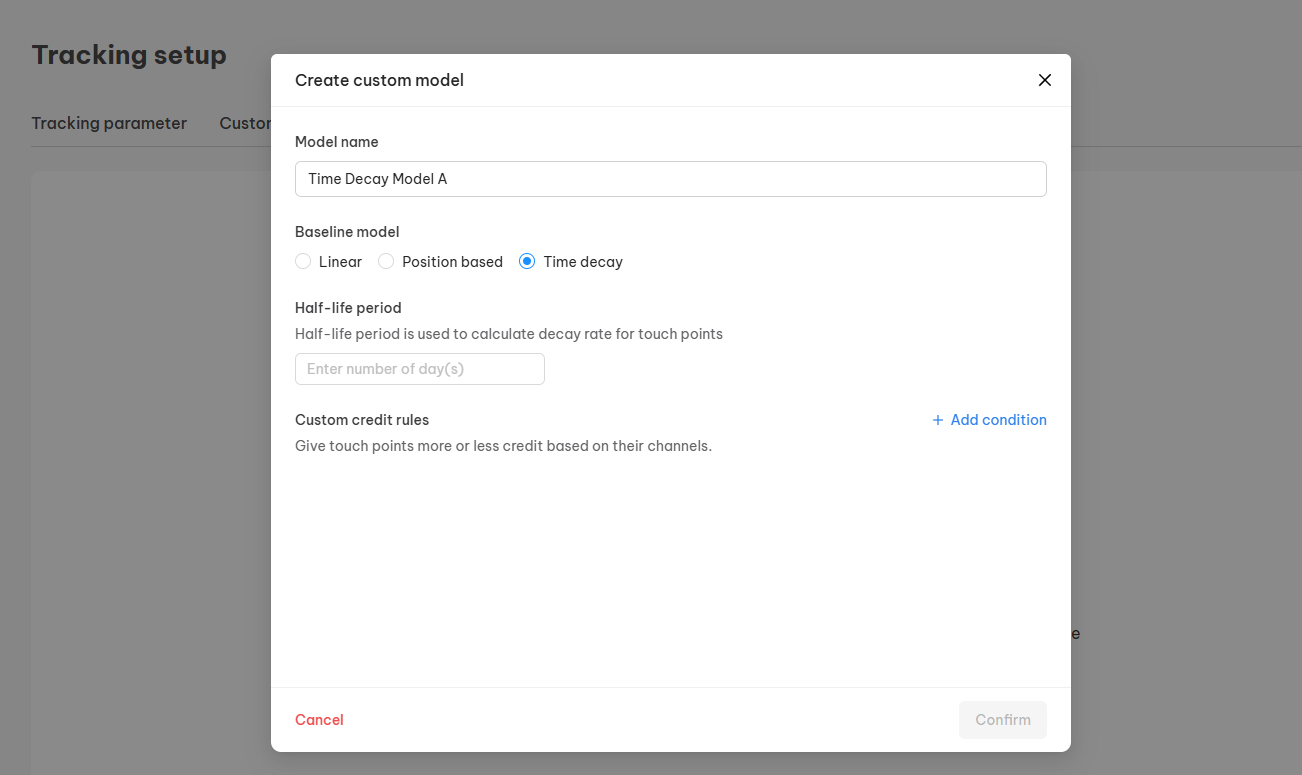
Step 2: Create a custom attribution model
- On Custom attribution model tab, click Create button
- Enter Model name – This is the public name of your custom model
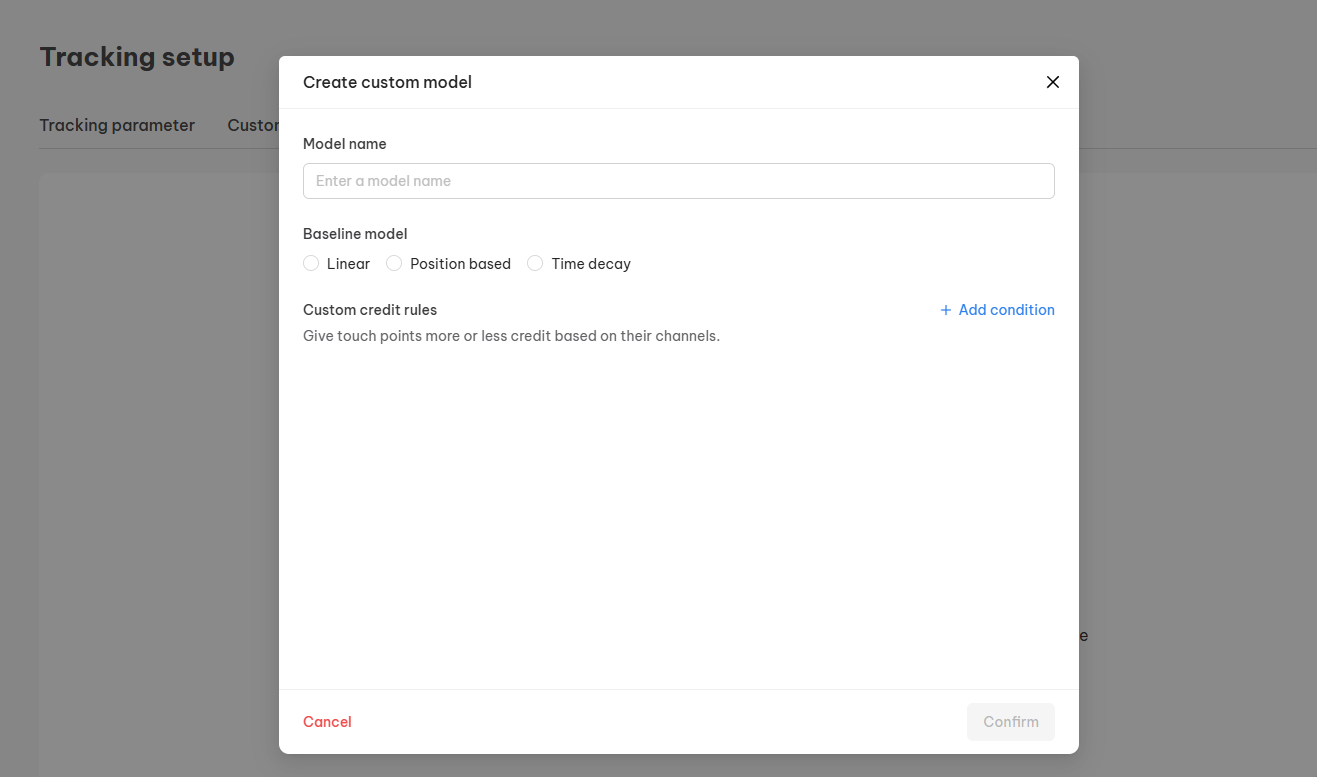
Step 3: Define touchpoint weights
Baseline model: This is the baseline logic of your custom model.
Select one from 3 available options
- Linear: Distributes credit equally across all touchpoints.
- Position based: Allocates a higher percentage to first and last interactions, with the rest spread across middle touchpoints.
- Time decay: Assigns more weight to touchpoints closer to conversion.
Here is the detail of how to set touchpoint weight based on which baseline model is chosen.
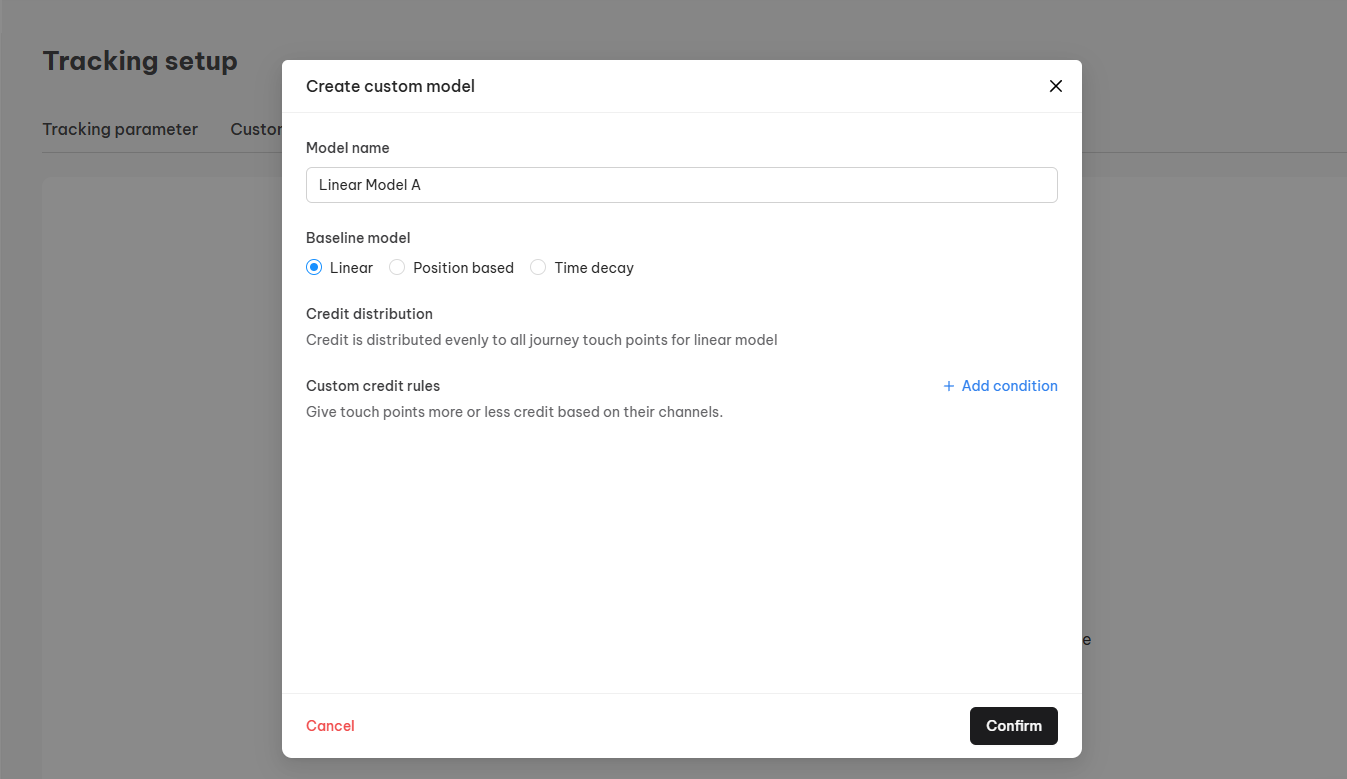
If you choose Linear as the baseline model, please notice the following:
- Credit distribution: Credit is distributed evenly to all journey touch points for the linear model
- Custom credit rule: Choose specific channel(s) to get less or more credit than the others.
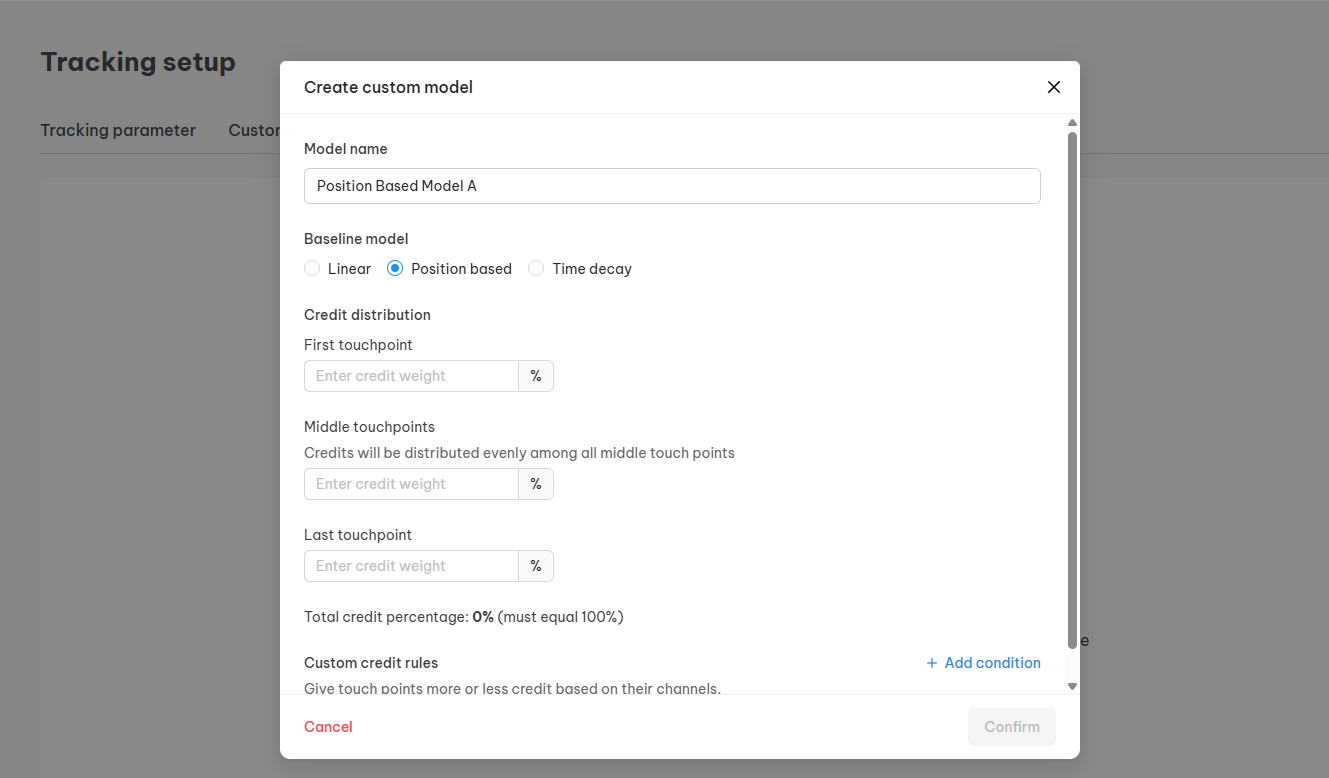
If you choose Position Based as the baseline model, please notice the following:
- Credit distribution:
- You can set credit weight for the first touchpoint, middle touchpoints, and last touchpoint.
- Credits will be distributed evenly among all middle touchpoints in the positon based model
- Custom credit rule: Choose specific channel(s) to get less or more credit than the others.
If you choose Time decay as the baseline model, please notice the following:
- Half-life period: Half-life period is used to calculate the decay rate for touch points (touchpoints closer to conversion receive exponentially more weight)
- Custom credit rule: Choose specific channel(s) to get less or more credit than the others.
Note:
- You can create multiple credit rules in a custom model.
- There is no more than 01 credit rule per channel.
- The maximum credit rule per custom model is 03.
- The credit weight is always a non-negative number.
- If the credit weight is 0, the selected channel is excluded from getting credit (not being attributed).
How to calculate a touchpoint’s credit weight with and without the credit rule.
A customer’s buying can contain one or multiple touchpoints.
When using a custom attribution model to assign credit value across touchpoints, we have to consider 2 factors:
- Baseline model
- Custom credit rule
The following are the formulas to calculate a touchpoint weight using custom attribution with and without the credit rule.
Case 1: A Custom Attribution Model Without Credit Rule.
| Customer journey | Baseline model | Formula of touchpoint’s credit weight |
| 01 touchpoint. | ALL models | This only touchpoint gets 100% credit weight, regardless of the baseline model. |
| 02 touchpoints. | Linear | Each touchpoint receives an equal share of the total credit. Credit per touchpoint = 100% ÷ 2 = 50% each. |
| Position based | Since there are only two touchpoints, this model effectively works the same as Linear Attribution (each touchpoint gets 50%). | |
| Time decay |  | |
| 03 or more touchpoints. | Linear | Credit weight per touchpoint = 100%/ Number of touchpoints |
| Position based | First and last touchpoints receive predefined weights (N1% and N2%). – 1st Touchpoint = N1% – Last Touchpoint = N2% – Middle Touchpoints share remaining = (100% – N1 – N2) ÷ Number of middle touchpoints | |
| Time decay | |
Case 2: A Custom Attribution Model With Credit Rule.
To calculate the touchpoint’s credit weight when applying a custom attribution model with custom credit rule, follow the steps below:
Step 1: Define the number of touchpoints and baseline model
Step 2: Apply the relevant formula for a specific applied baseline model (Check the formula table above)
Step 3: Update the formula with the applied custom credit rule for particular channel(s)
Step 4: Normalize the touchpoint credit weight (To ensure that all credit weights sum up to 100%)
Example of custom attribution models with the different baseline models (Custom credit rule is applied)
Linear-Based Attribution Model with Custom Credit Rules
This model follows a linear attribution approach with custom credit rules for specific channels.
Model Conditions:
- Baseline Model: Linear (Equal credit distribution across all touchpoints)
- Custom Credit Rules:
- Google Ads: Credit is weighted 2.5x higher than other channels.
- Direct: Credit is set to 0% (this channel receives no credit).
Example: Buying Journey A
The customer interacts with five touchpoints:
- Google Ad 1
- Organic Google
- TikTok Ad 1
- Direct
- Facebook Ad 1
Step 1: Baseline Credit Distribution (Before Applying Credit Rules)
In a standard linear model, credit is distributed equally:
- Each touchpoint receives 100% ÷ 5 = 20%
- Credit allocation before adjustments:
- Google Ad 1 → 20%
- Organic Google → 20%
- TikTok Ad 1 → 20%
- Direct → 20%
- Facebook Ad 1 → 20%
Step 2: Adjusted Credit Distribution (After Applying Credit Rules)
- Direct (Rule: 0% credit) → Receives 0%
- Google Ad 1 (Rule: 2.5x credit multiplier)
Adjusted Credit for Google

- Remaining Channels (Organic Google, TikTok Ad 1, Facebook Ad 1)

Final Credit Distribution (After Adjustments):
| Channel | Adjusted Credit % |
| Google Ad 1 | 45.45% |
| Organic Google | 18.18% |
| TikTok Ad 1 | 18.18% |
| Direct | 0% |
| Facebook Ad 1 | 18.18% |
| Total | 100% |
Position-Based Attribution Model with Custom Credit Rules
This model follows a position-based attribution approach with custom credit rules for specific channels.
Model Conditions:
- Baseline Model: Position-Based (First and Last touchpoints receive more credits)
- Credit Weight Distribution:
- First touchpoint (Google Ad 1): 40%
- Last touchpoint (Facebook Ad 1): 40%
- Remaining touchpoints (Organic Google, TikTok Ad 1, Direct): Share the remaining 20% equally (6.67% each)
- Custom Credit Rules:
- Google Ads: Credit is weighted 2.5x higher than other channels.
- Direct: 0% credit (excluded from distribution)
Example: Buying Journey A
The customer interacts with five touchpoints:
- Google Ad 1 (First Touch)
- Organic Google
- TikTok Ad 1
- Direct
- Facebook Ad 1 (Last Touch)
Step 1: Baseline Credit Distribution (Before Applying Custom Rules)
- Google Ad 1 (First Touch) → 40%
- Facebook Ad 1 (Last Touch) → 40%
- Remaining touchpoints (Organic Google, TikTok Ad 1, Direct) → Share 20% equally (6.67% each)
Before Adjustments:
| Channel | Baseline Credit % |
| Google Ad 1 | 40% |
| Organic Google | 6.67% |
| TikTok Ad 1 | 6.67% |
| Direct | 6.67% |
| Facebook Ad 1 | 40% |
| Total | 100% |
Step 2: Adjusted Credit Distribution (After Applying Rules)
- Direct (Rule: 0% credit) → Receives 0%
- Google Ad 1 (Rule: 2.5x multiplier applied to its 40%)
Adjusted Credit for Google

- Facebook Ad 1 (No adjustment, keeps 40%)
- Remaining channels (Organic Google, TikTok Ad 1)
Adjusted Credit for Each

Final Credit Distribution (After Adjustments):
| Channel | Adjusted Credit % |
| Google Ad 1 | 58.82% |
| Organic Google | 9.81% |
| TikTok Ad 1 | 9.81% |
| Direct | 0% |
| Facebook Ad 1 | 40% |
| Total | 100% |
Time Decay Attribution Model with Custom Credit Rules
This model follows a time decay attribution approach, where touchpoints closer to the conversion receive more credit.
Custom credit rules are applied to adjust the credit allocation for specific channels.
Model Conditions:
- Baseline Model: Time Decay
- Half-Life: 7 days (meaning a touchpoint occurring 7 days before conversion gets half the credit of a touchpoint on the conversion day)
- Custom Credit Rules:
- Google Ads: Credit is weighted 2.5x higher than other channels.
- Direct: 0% credit (excluded from distribution)
Example: Buying Journey A
The customer interacts with five touchpoints at different times before conversion:
| Touchpoint | Days Before Conversion |
| Google Ad 1 | 12 days before conversion |
| Organic Google | 10 days before conversion |
| TikTok Ad 1 | 7 days before conversion |
| Direct | 3 days before conversion |
| Facebook Ad 1 | 0 days before conversion (conversion day) |
Step 1: Calculate Baseline Decay Weights
Using the time decay formula:
| Touchpoint | Days Before Conversion | Baseline Decay Weight |
| Google Ad 1 | 12 days | 0.512/7= 0.304 |
| Organic Google | 10 days | 0.510/7= 0.371 |
| TikTok Ad 1 | 7 days | 0.57/7= 0.5 |
| Direct | 3 days | 0.53/7= 0.742 |
| Facebook Ad 1 | 0 days | 0.50/7= 1 |
Total Baseline Weight (Before Adjustments)
0.304 + 0.371 + 0.5 + 0.742 + 1 = 2.917
Normalized Credit Distribution (Before Adjustments)
| Touchpoint | Baseline Decay Weight | Normalized Credit % |
| Google Ad 1 | 0.304 | 10.42 % |
| Organic Google | 0.371 | 12.71 % |
| TikTok Ad 1 | 0.5 | 17.14 % |
| Direct | 0.742 | 25.44 % |
| Facebook Ad 1 | 1.0 | 34.29 % |
Step 2: Adjusted Credit Distribution (After Applying Rules)
- Direct (Rule: 0% credit) → Receives 0%
- Google Ad 1 (Rule: 2.5x multiplier applied to its weight)
New weight for Google Ad 1:
0.304 × 2.5 = 0.608
New Total Adjusted Weight (Excluding Direct):
0.608 + 0.371 + 0.5 + 1.0 = 2.479
Recalculate Normalized Credit % (After Adjustments):
| Touchpoint | Adjusted Decay Weight | Final Credit % |
| Google Ad 1 | 0.608 | 24.53% |
| Organic Google | 0.371 | 14.97% |
| TikTok Ad 1 | 0.5 | 20.17% |
| Direct | 0 | 0% |
| Facebook Ad 1 | 1.0 | 40.33% |
Final Credit Distribution (After Adjustments):
| Channel | Adjusted Credit % |
| Google Ad 1 | 24.53% |
| Organic Google | 14.97% |
| TikTok Ad 1 | 20.17% |
| Direct | 0% |
| Facebook Ad 1 | 40.33% |
| Total | 100% |
Need any help?
If you have any questions or need further assistance, please contact us via live chat inside the app or send us an email to [email protected]
Our customer success team is happy to help!